LCC-LocoNet Gateway Firmware C1 Update.
Be sure that you are using JMRI version 4.24 or later.
Using Firefox, Google
Chrome, or Safari, (NOT Microsoft Edge) download the latest firmware.
(e.g. 'LCC_Gateway_UPDATE_C1.hex')
Note that these upgrades
will not disturb your existing configuration data which is stored in a
different NVR chip from program memory.
C1
Updates Include:
- Repairs a bug in the LocoNet processing where a LocoNet Break or
Collision could lock up the translation process from LocoNet to LCC.
B7a
Updates Included:
- Revisits the power up sequence issue in B6b. The previous fix did not
work for the new Rev-C hardware.
- Added Data LED blink codes to indicate error messages.
B7a also includes all B6b and B6c updates:
- Corrects an error in the decoding of LocoNet sensor entries.
Previously any sensors numbered over LS128 were incorrectly entered.
- B6b update includes a correction in the power up sequence that allows
proper start up in any order of power application. (USB, Network, and
External Power Plug)
Firmware
Update:
The LCC-LocoNet node includes its own USB interface. This
creates a special issue when upgrading its firmware. The issue is that
when an LCC device switches from Normal Mode to Boot Mode (Firmware upgrade),
the processor stops, and then restarts into the alternate mode. For most
nodes this is not any issue and the user does not even notice. However
when the LCC-LocoNet Gateway does this mode switch it breaks the USB
connection to Windows that allows JMRI to run. This is sort of like
sitting on a limb and sawing down the tree. (like Road Runner can do)
This requires stopping and restarting JMRI twice during the upgrade
process.
To upgrade the LCC-LocoNet Gateway there are two options:
A. If you have a LCC Buffer-USB available, then use it
as your connection to JMRI and upgrade the firmware normally as shown
below in the 'Firmware update process'.
B. If your only LCC to computer connection is over the
LCC-LocoNet Gateway itself, then you must follow the following steps:
- Be sure that the LCC-LocoNet
Gateway is powered continuously during the following steps and is
attached to an LCC network with at least one other node.
- Start the Firmware update
process (below) normally.
- The process will stall (hang)
after you press 'Load' at step 6 below. (because JMRI became
disconnected during the switch to boot mode)
- Exit JMRI (to release the
failed COM port)
- Unplug the LCC-LocoNet Gateway USB
cable from your computer.
- Plug the LCC-LocoNet Gateway USB
cable back into your computer. (to restart the COM port)
- Restart JMRI and re-run the
Firmware update process. Only the LCC-LocoNet
Gateway itself will be available to upgrade.
- It should now be able to
complete the 'Load' process, but will stall again at the
completion of step 7 below.
- Exit JMRI (to again release
the disconnected COM port)
- Unplug the LCC-LocoNet Gateway USB
cable from your computer.
- Plug the LCC-LocoNet Gateway USB
cable back into your computer. (to restart the COM port once again)
- Restart JMRI to resume normal
operation at Step 8 below.
Firmware update process:
- Start JMRI and select "LCC".
- Select ‘Firmware Update’
from the LCC drop down list.

- Click ‘Select’ to pick a
firmware file.
- From the file menu, select: 'LCC_Gateway_UPDATE_C1.hex' or
the latest upgrade available.
- Select your 'Target Node ID'.
- Click the 'Load' button to
initiate the download to your LCC-LocoNet Gateway.
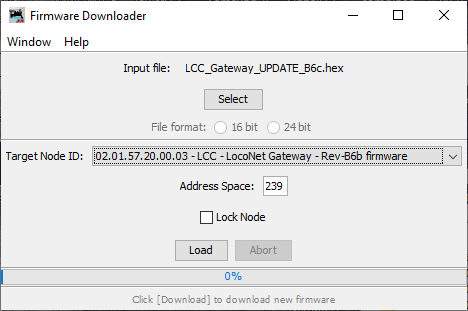
Note:
This image is from previous upgrade.
- Wait until 'updating device
firmware..' progress bar is 100% and shows 'Operation Complete'.
- Open the OpenLCB Network Tree
window. (LCC-Configure Nodes)
- The updated node should now
show 'Mod: LCC-LocoNet Gateway' and 'Software Version: rev-B7'.
- Any errors will be shown in
the lower window ticker tape display.
If
the
node does not automatically enter boot mode and start the upgrade it
may be forced into boot mode by un-powering it, then holding down the
‘Prog’ button as you power it up again. The gold LED should start
blinking the one flash error code to indicate that it is in forced
boot mode. This will also likely be required after a failed upgrade
attempt.